Wednesday, November 25, 2009

Reusable component template as given in the extjs.com documentation

A Re-usable Template

The following is a template (based on the template posted by Jozef Sakalos in mjlecomte's forum post) that you can use as a starting-point when extending Ext.Component classes

MyComponent = Ext.extend(Ext.some.component, {
// Prototype Defaults, can be overridden by user's config object
propA: 1,

initComponent: function(){
// Called during component initialization

// Config object has already been applied to 'this' so properties can
// be overriden here or new properties (e.g. items, tools, buttons)
// can be added, eg:
Ext.apply(this, {
propA: 3
});

// Before parent code

// Call parent (required)
MyComponent.superclass.initComponent.apply(this, arguments);

// After parent code
// e.g. install event handlers on rendered component
},

// Override other inherited methods
onRender: function(){

// Before parent code

// Call parent (required)
MyComponent.superclass.onRender.apply(this, arguments);

// After parent code

}
});

// register xtype to allow for lazy initialization
Ext.reg('mycomponentxtype', MyComponent);

As an enlightening example, if you used the above class via either of the following:

var myComponent = new MyComponent({
propA: 2
});
// Or lazily:
{..
items: {xtype: 'mycomponentxtype', propA: 2}
..}

then the property propA would have been set three times, to the values 1, 2, and 3 consecutively. If you follow the code (and the comments) through you will see that value starts as 1 (Prototype default) and then is set to 2 by the user's config object, and finally is overridden in initComponent and set to 3. Hopefully this example gives you a bit of insight into the order in which the code is executed (not in the order that you read it from start to finish!).

Because components nest other components, here's a quick way to grab the top-most component.

var topCmp = (function(o){while(o.ownerCt){o=o.ownerCt} return o;})(this);

More clearer and specific example


Application.PersonnelGrid = Ext.extend(Ext.grid.GridPanel, {
border:false
,initComponent:function() {
Ext.apply(this, {
store:new Ext.data.Store({...})
,columns:[{...}, {...}]
,plugins:[...]
,viewConfig:{forceFit:true}
,tbar:[...]
,bbar:[...]
});

Application.PersonnelGrid.superclass.initComponent.apply(this, arguments);
} // eo function initComponent

,onRender:function() {
this.store.load();

Application.PersonnelGrid.superclass.onRender.apply(this, arguments);
} // eo function onRender
});

Ext.reg('personnelgrid', Application.PersonnelGrid);

Tuesday, November 24, 2009

Optimistic Concurrency Control by enabling versioning in Hibernate

Note:
The following article is an excerpt from the great book - "Java Persistence with Hibernate"


Choosing an isolation level

Developers (ourselves included) are often unsure what transaction isolation level
to use in a production application. Too great a degree of isolation harms scalability
of a highly concurrent application. Insufficient isolation may cause subtle,
unreproduceable bugs in an application that you’ll never discover until the system
is working under heavy load.

Note that we refer to optimistic locking (with versioning) in the following explanation,
a concept explained later in this chapter. You may want to skip this section
and come back when it’s time to make the decision for an isolation level in your
application. Picking the correct isolation level is, after all, highly dependent on
your particular scenario. Read the following discussion as recommendations, not
carved in stone.

Hibernate tries hard to be as transparent as possible regarding transactional
semantics of the database. Nevertheless, caching and optimistic locking affect
these semantics. What is a sensible database isolation level to choose in a Hibernate
application?

First, eliminate the read uncommitted isolation level. It’s extremely dangerous to
use one transaction’s uncommitted changes in a different transaction. The rollback
or failure of one transaction will affect other concurrent transactions. Rollback
of the first transaction could bring other transactions down with it, or
perhaps even cause them to leave the database in an incorrect state. It’s even possible
that changes made by a transaction that ends up being rolled back could be
committed anyway, because they could be read and then propagated by another
transaction that is successful!

Secondly, most applications don’t need serializable isolation (phantom reads
aren’t usually problematic), and this isolation level tends to scale poorly. Few
existing applications use serializable isolation in production, but rather rely on
pessimistic locks (see next sections) that effectively force a serialized execution of
operations in certain situations.

This leaves you a choice between read committed and repeatable read. Let’s first
consider repeatable read. This isolation level eliminates the possibility that one
transaction can overwrite changes made by another concurrent transaction (the
second lost updates problem) if all data access is performed in a single atomic
database transaction. A read lock held by a transaction prevents any write lock a
concurrent transaction may wish to obtain. This is an important issue, but
enabling repeatable read isn’t the only way to resolve it.

Let’s assume you’re using versioned data, something that Hibernate can do for
you automatically. The combination of the (mandatory) persistence context
cache and versioning already gives you most of the nice features of repeatable
read isolation. In particular, versioning prevents the second lost updates problem,
and the persistence context cache also ensures that the state of the persistent
instances loaded by one transaction is isolated from changes made by other transactions.
So, read-committed isolation for all database transactions is acceptable if
you use versioned data.

Repeatable read provides more reproducibility for query result sets (only for
the duration of the database transaction); but because phantom reads are still
possible, that doesn’t appear to have much value. You can obtain a repeatable-
read guarantee explicitly in Hibernate for a particular transaction and piece
of data (with a pessimistic lock).
Setting the transaction isolation level allows you to choose a good default locking
strategy for all your database transactions. How do you set the isolation level?

Setting an isolation level

Every JDBC connection to a database is in the default isolation level of the DBMS—
usually read committed or repeatable read. You can change this default in the
DBMS configuration. You may also set the transaction isolation for JDBC connections
on the application side, with a Hibernate configuration option:
hibernate.connection.isolation = 4
Hibernate sets this isolation level on every JDBC connection obtained from a
connection pool before starting a transaction. The sensible values for this option
are as follows (you may also find them as constants in java.sql.Connection):
■ 1—Read uncommitted isolation
■ 2—Read committed isolation
■ 4—Repeatable read isolation
■ 8—Serializable isolation

Note that Hibernate never changes the isolation level of connections obtained
from an application server-provided database connection in a managed environment!
You can change the default isolation using the configuration of your application
server. (The same is true if you use a stand-alone JTA implementation.)
As you can see, setting the isolation level is a global option that affects all connections
and transactions. From time to time, it’s useful to specify a more restrictive
lock for a particular transaction. Hibernate and Java Persistence rely on
optimistic concurrency control, and both allow you to obtain additional locking
guarantees with version checking and pessimistic locking.

An optimistic approach always assumes that everything will be OK and that conflicting
data modifications are rare. Optimistic concurrency control raises an
error only at the end of a unit of work, when data is written. Multiuser applications
usually default to optimistic concurrency control and database connections
with a read-committed isolation level. Additional isolation guarantees are
obtained only when appropriate; for example, when a repeatable read is required.
This approach guarantees the best performance and scalability.
Understanding the optimistic strategy
To understand optimistic concurrency control, imagine that two transactions read
a particular object from the database, and both modify it. Thanks to the read-committed
isolation level of the database connection, neither transaction will run into any dirty reads. However, reads are still nonrepeatable, and updates may also be
lost. This is a problem you’ll face when you think about conversations, which are
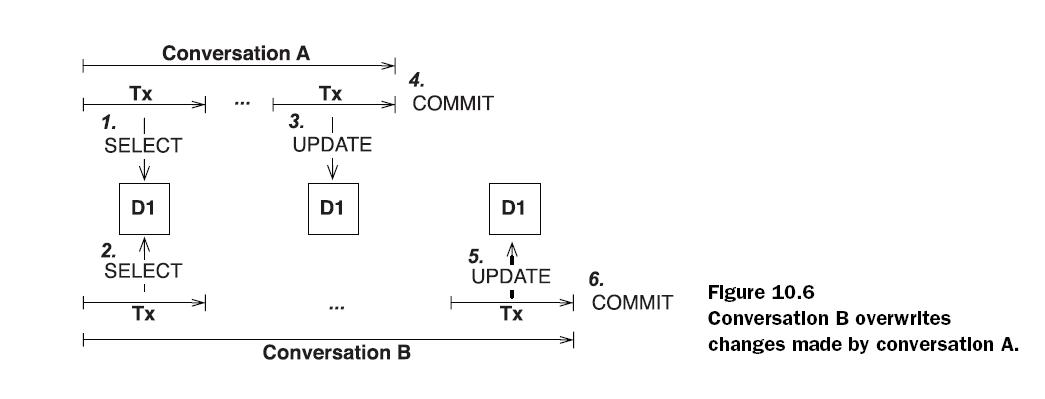
atomic transactions from the point of view of your users. Look at figure 10.6.
Let’s assume that two users select the same piece of data at the same time. The
user in conversation A submits changes first, and the conversation ends with a successful
commit of the second transaction. Some time later (maybe only a second),
the user in conversation B submits changes. This second transaction also commits
successfully. The changes made in conversation A have been lost, and (potentially
worse) modifications of data committed in conversation B may have been based
on stale information.

You have three choices for how to deal with lost updates in these second transactions
in the conversations:
■ Last commit wins—Both transactions commit successfully, and the second
commit overwrites the changes of the first. No error message is shown.
■ First commit wins—The transaction of conversation A is committed, and the
user committing the transaction in conversation B gets an error message.
The user must restart the conversation by retrieving fresh data and go
through all steps of the conversation again with nonstale data.
■ Merge conflicting updates—The first modification is committed, and the transaction
in conversation B aborts with an error message when it’s committed.
The user of the failed conversation B may however apply changes selectively,
instead of going through all the work in the conversation again.

If you don’t enable optimistic concurrency control, and by default it isn’t enabled,
your application runs with a last commit wins strategy. In practice, this issue of lost
updates is frustrating for application users, because they may see all their work
lost without an error message.

Figure 10.6
Conversation B overwrites
changes made by conversation A.

Obviously, first commit wins is much more attractive. If the application user of
conversation B commits, he gets an error message that reads, Somebody already committed
modifications to the data you’re about to commit. You’ve been working with stale
data. Please restart the conversation with fresh data. It’s your responsibility to design
and write the application to produce this error message and to direct the user to
the beginning of the conversation. Hibernate and Java Persistence help you with
automatic optimistic locking, so that you get an exception whenever a transaction
tries to commit an object that has a conflicting updated state in the database.
Merge conflicting changes, is a variation of first commit wins. Instead of displaying
an error message that forces the user to go back all the way, you offer a dialog that
allows the user to merge conflicting changes manually. This is the best strategy
because no work is lost and application users are less frustrated by optimistic concurrency
failures. However, providing a dialog to merge changes is much more
time-consuming for you as a developer than showing an error message and forcing
the user to repeat all the work. We’ll leave it up to you whether you want to use
this strategy.

Optimistic concurrency control can be implemented many ways. Hibernate
works with automatic versioning.

Enabling versioning in Hibernate
Hibernate provides automatic versioning. Each entity instance has a version,
which can be a number or a timestamp. Hibernate increments an object’s version
when it’s modified, compares versions automatically, and throws an exception if a
conflict is detected. Consequently, you add this version property to all your persistent
entity classes to enable optimistic locking:
public class Item {
...
private int version;
...
}
You can also add a getter method; however, version numbers must not be modified
by the application. The <version> property mapping in XML must be placed
immediately after the identifier property mapping:
<class name="Item" table="ITEM">
<id .../>
<version name="version" access="field" column="OBJ_VERSION"/>
...
</class>

The version number is just a counter value—it doesn’t have any useful semantic
value. The additional column on the entity table is used by your Hibernate application.
Keep in mind that all other applications that access the same database can
(and probably should) also implement optimistic versioning and utilize the same
version column. Sometimes a timestamp is preferred (or exists):
public class Item {
...
private Date lastUpdated;
...
}
<class name="Item" table="ITEM">
<id .../>
<timestamp name="lastUpdated"
access="field"
column="LAST_UPDATED"/>
...
</class>
In theory, a timestamp is slightly less safe, because two concurrent transactions
may both load and update the same item in the same millisecond; in practice,
this won’t occur because a JVM usually doesn’t have millisecond accuracy (you
should check your JVM and operating system documentation for the guaranteed
precision).

Furthermore, retrieving the current time from the JVM isn’t necessarily safe in
a clustered environment, where nodes may not be time synchronized. You can
switch to retrieval of the current time from the database machine with the
source="db" attribute on the mapping. Not all Hibernate SQL dialects
support this (check the source of your configured dialect), and there is
always the overhead of hitting the database for every increment.
We recommend that new projects rely on versioning with version numbers, not
timestamps.

Optimistic locking with versioning is enabled as soon as you add a
or a <timestamp> property to a persistent class mapping. There is no other switch.
How does Hibernate use the version to detect a conflict?

Automatic management of versions
Every DML operation that involves the now versioned Item objects includes a version
check. For example, assume that in a unit of work you load an Item from the
database with version 1. You then modify one of its value-typed properties, such as
the price of the Item. When the persistence context is flushed, Hibernate detects
that modification and increments the version of the Item to 2. It then executes
the SQL UPDATE to make this modification permanent in the database:
update ITEM set INITIAL_PRICE='12.99', OBJ_VERSION=2
where ITEM_ID=123 and OBJ_VERSION=1
If another concurrent unit of work updated and committed the same row, the
OBJ_VERSION column no longer contains the value 1, and the row isn’t updated.
Hibernate checks the row count for this statement as returned by the JDBC
driver—which in this case is the number of rows updated, zero—and throws a
StaleObjectStateException. The state that was present when you loaded the
Item is no longer present in the database at flush-time; hence, you’re working
with stale data and have to notify the application user. You can catch this exception
and display an error message or a dialog that helps the user restart a conversation
with the application.
What modifications trigger the increment of an entity’s version? Hibernate
increments the version number (or the timestamp) whenever an entity instance is
dirty. This includes all dirty value-typed properties of the entity, no matter if
they’re single-valued, components, or collections. Think about the relationship
between User and BillingDetails, a one-to-many entity association: If a Credit-
Card is modified, the version of the related User isn’t incremented. If you add or
remove a CreditCard (or BankAccount) from the collection of billing details, the
version of the User is incremented.
If you want to disable automatic increment for a particular value-typed property
or collection, map it with the optimistic-lock="false" attribute. The
inverse attribute makes no difference here. Even the version of an owner of an
inverse collection is updated if an element is added or removed from the
inverse collection.
As you can see, Hibernate makes it incredibly easy to manage versions for optimistic
concurrency control. If you’re working with a legacy database schema or
existing Java classes, it may be impossible to introduce a version or timestamp
property and column. Hibernate has an alternative strategy for you.

Transaction Isolation Levels

Dirty Read
A dirty read occurs if a one transaction reads changes made by another transaction
that has not yet been committed. This is dangerous, because the changes made by
the other transaction may later be rolled back, and invalid data may be written by
the first transaction, as shown in the figure


Non-repeatable Read
An unrepeatable read occurs if a transaction reads a row twice and reads different
state each time. For example, another transaction may have written to the row
and committed between the two reads as shown in the figure


Phantom Read
A phantom read is said to occur when a transaction executes a query twice, and
the second result set includes rows that weren’t visible in the first result set or rows
that have been deleted. (It need not necessarily be exactly the same query.) This
situation is caused by another transaction inserting or deleting rows between the
execution of the two queries as shown in the figure


Lost update
A lost update occurs if two transactions both update a row and then the second
transaction aborts, causing both changes to be lost. This occurs in systems that
don’t implement locking.


Transaction Isolation Levels

Read Uncommitted
A system that permits dirty reads but not lost updates is said to operate in
read uncommitted isolation. One transaction may not write to a row if another
uncommitted transaction has already written to it. Any transaction may read
any row, however.

Read Committed
A system that permits unrepeatable reads but not dirty reads is said to implement
read committed transaction isolation. This may be achieved by using
shared read locks and exclusive write locks. Reading transactions don’t
block other transactions from accessing a row. However, an uncommitted
writing transaction blocks all other transactions from accessing the row.

Repeatable Read
A system operating in repeatable read isolation mode permits neither unrepeatable
reads nor dirty reads. Phantom reads may occur. Reading transactions
block writing transactions (but not other reading transactions), and
writing transactions block all other transactions.

Serializable
Serializable provides the strictest transaction isolation. This isolation level
emulates serial transaction execution, as if transactions were executed one
after another, serially, rather than concurrently. Serializability may not be
implemented using only row-level locks. There must instead be some other
mechanism that prevents a newly inserted row from becoming visible to a
transaction that has already executed a query that would return the row.

Sunday, November 22, 2009

Managing User Preferences - Personalize the User Space

Managing User Preferences

User does many things once he logins into the application to personalize his space.
Some of the many things will be setting the window sizes, positioning the windows, hiding or showing widgets etc etc.

Here I will briefly go through how to manage user preferences in ext js.

Initialize the state provider

Ext.state.Manager.setProvider(new HttpProvider());
In this case we are initializing the manager with the Http state provider persisting the state to the database.


Initialize the scheduler

Scheduler in this case will schedule the task for persisting the state to the database.
delayedTask = new Ext.util.DelayedTask(this.persistState, this);
Here DelayedTask is used as the scheduler.


Initialize the state manager

Initialize the state manager by loading any state persisted before by reading it from the database via HttpProvider.


Start the scheduler

delayedTask.delay(1000);
Here we are asking the scheduler to poll the state manager once in 1000 milli seconds to know if there are any changes in the state to be persisted.
The callback api, in this case, the persistState api will be called if there are any changes to the state.

persistState api may look like this,

function persistState() {

if(!stateDirty) {
delayedTask.delay(1000); // If state not dirty delay the scheduler for 1000 milliseconds more
}

delayedTask.cancel(); // stop the scheduler and submit the state to the server asking it to persist to the database.
submitState();
}


Override the set method of the provider
Set method of the provider is used to set the state [user preference like window size, x & y position etc] to the state manager.

Override the set method of the Provider to set the stateDirty flag to true and start the scheduler which was cancelled when the state was submitted to the server.
stateDirty = true;
delayedTask.delay(1000);
superclass.set();

Sunday, November 15, 2009

Shopping Cart: Project set up & Login Screen

1) Create new project
Project is the collection of modules.

2) Create Modules
Module is the collection of facets.


3) There are lots of facets but 4 facets are quiet important to make a note of
Web, EJB, JPA and JEE facets.


4) Write a web.xml for your application in the web facet.


5) Configure an authenticator valve in context.xml


6) Write a redirect servlet

package com.shoppingcart.security.login;

import javax.servlet.http.HttpServlet;
import javax.servlet.http.HttpServletRequest;
import javax.servlet.http.HttpServletResponse;
import javax.servlet.ServletException;
import javax.servlet.RequestDispatcher;
import java.io.IOException;
import java.util.Enumeration;


public class RedirectServlet extends HttpServlet
{
protected void service(HttpServletRequest httpServletRequest, HttpServletResponse httpServletResponse) throws ServletException, IOException
{
final String svlpath = httpServletRequest.getServletPath();
Enumeration en = httpServletRequest.getAttributeNames();
String actualReqPathKey = "javax.servlet.forward.servlet_path";
String actualReqPath = (String)httpServletRequest.getAttribute(actualReqPathKey);

String pageName = actualReqPath;

if ("/unsecured/login".equals(svlpath)) {
if("/index.jsp".equals(actualReqPath)) {
pageName = "/Login.jsp";
}
}
else {
throw new ServletException("RedirectServlet: operation '" + svlpath + "' not supported!");
}
redirectToLogin(httpServletRequest, httpServletResponse, pageName);
}

private void redirectToLogin(HttpServletRequest request, HttpServletResponse response, String pageName) throws IOException, ServletException
{
RequestDispatcher dispatcher = this.getServletContext().getContext("/shoppingcart").getRequestDispatcher(pageName);
if (dispatcher != null) {
response.setContentType("text/html");
dispatcher.include(request, response);
}
}

}


7) Mention about the module in application.xml


8) Configure JBoss from the ide.


9) Compile the application, deploy and run jboss.


How does it all work

When the user points the browser to localhost:8080/shoppingcart for the first time, the jboss server figures out from the web.xml configuration that this resource cannot be accessed publicly by everyone and that it needs to be secured and only allowed roles can access it. To authenticate the jboss server will use the FormAuthenticator which is configured as the valve in context.xml. The FormAuthenticator will interpret the request and changes the url to the one mentioned in web.xml, in this case it is /unsecured/login and redirects to RedirectServlet. The RedirectServlet will dispatch the request to Login.jsp and hence the Login.jsp is sent back to the browser.

Saturday, October 31, 2009

Probability 6

Mixing multiple probabilities

Given a box of 10 coins out of which 9 coins are fair and one coin has both sides heads, what is the probability of getting all heads on picking a coin from the bag and flipping it 5 times.

There are two outcomes possible if we pick a coin from the bag.
The first outcome would be that we pick a normal coin and its probability would be 9/10 --- (1).
The second outcome would be that we pick a coin having both sided heads, whose probability is 1/10 --- (2).

Now after this,
Given a normal coin what is the probability of getting all 5 heads is, as we know it to be (1/2)*(1/2)*(1/2)*(1/2)*(1/2) = 1/32 --- (3).

Given a both sided heads coin, the probability of getting all 5 heads is 1 --- (4).

From (1), (2), (3) & (4) we get the
P(getting all 5 heads) = (P(picking the normal coin)*P(getting all heads provided its normal coin))+(P(Picking an unfair coin)*P(getting all heads provided its unfair coin))

= (1/32)*(9/10) + 1*(1/10) = 9/320 + 1/10 = 41/320

Probability 5

What is the probability of getting a 7 when two dice is thrown.

The total number of outcomes throwing 2 dice would be 36 as shown in the figure below.
As you can see in the figure, the number of times we get 7 is 6.


Therefore, the P(7) = 6/36 = 1/6.

Wednesday, October 28, 2009

Probability 4

Example:
---------

The probability of me making a shot in basketball is 80%, I have 3 shots and we need 1 pt to win the match. What is the probability of we winning the match?

P(we winning) = P(me making atleast one shot) = 1 - P(me making no shots at all)

P(me making no shots at all) = 0.2 * 0.2 * 0.2 = 0.008 = 0.8%

P(we winning) = 1-0.008 = 99.2%

Tuesday, October 27, 2009

Probability 3

Arrangements [Permutations] meeting Probability.

1) Find the probability of getting only one heads in 5 flips

Outcomes are

TTTTH
TTTHT
TTHTT
THTTT
HTTTT

The probability of occurrence of each of these outcomes is 1/32.
Since there are 5 such arrangements the total probability becomes 5/32.


2) Find the probability of not getting exactly one heads in 5 flips

This is exactly equal to all the outcomes except the above which results to 1-5/32 = 27/32

Monday, October 26, 2009

Probability 2

Probability Tree

Probability Tree is a very good tool in finding the probability of an occurrence of an event provided -
1) The outcomes or circumstances of an event are very small in number
2) The experiment should not be repeated large number of times

Note:
The depth of the tree is the number of times the experiment is repeated.
Example: Flipping coins 5 times.

The width of the tree is the count of all possible outcomes of an event.
Example: H & T are the 2 outcome of flipping the coin.

Lets take an example and solve the probability using Probability Tree

Find the probability of two heads occuring on two consecutive flips of coins, i.e., P(HH)

From the above probability tree the total out comes or circumstances of flipping coin twice is 4. Out of the 4 outcomes, the total number of times we get HH is 1, so the P(HH) = 1/4.

Another way to look at it is the probability of first flip leading to heads is 1/2, and this remains the same even during the second flip because both heads and tails are equally probable and they are not mutually exclusive so it leads to 1/2 * 1/2 = 1/4.

Note we multiply the probabilities because the events are not mutually exclusive.

Similary P(1H, 1T) = 2/4 = 1/2

P(HHHHH) = 1/2*1/2*1/2*1/2*1/2 = 1/32

P(Out of 7 flips, heads should not come even once) = p(TTTTTTT) = 1/128

Sunday, October 25, 2009

Probability 1

Probability
-------------

Two ways of looking at probability are:

1) Repeated experiments possible [Frequency Test]
Perform an experiment repeatedly and identify wht percent of times the experiment has
behaved the way u want it to behave.
Example: Flipping a coin hundred times to know the probability of occurrence of heads.

2) Repeated experiments not possible
Based on the data that you have, how strongly you believe that the experiment will behave
the way you want it to behave.
Example: What are the chances that its going to rain today.


Definition of Probability
-----------------------------

P(x) = number of events in which x is true
------------------------------------
total number of events or all possible outcomes of an event or all possible circumstances of an event.

In case of flipping a coin, the total number of circumstances or outcome of flipping a coin is 2, it can be either heads or tails.

assuming that the occurence of all the events are equally probable, i.e no single event should occur more number of times than other events.


Examples:
---------

P(Occurence of Head on flipping a coin) = 1 / 2 = 50%

Sunday, October 18, 2009

Determining the master node in a JBoss Cluster


Thanks to the original author and the source

How to determine which node in the cluster is the master node?

Have you ever dealt with clustered singleton service? How to determine which cluster node is the master? Well, if I am the current node, I can simply ask whether I am the master or not. But what if I already know that the current node is not the master, and I want to determine which node among other nodes in the cluster is the master?

First I would like to give brief summary about HASingleton service (HA stands for High Availability).

Summary:
HASingleton service, is a service that is deployed on every node in a cluster, but runs only on one node, while the other nodes remain passive. The node that the service runs on, is the master node.

How does JBoss selects the master node?
Well the first node in a cluster will become master node. If existing master node will leave the cluster as a result of a shutdown for example, another node is selected as master from the remaining nodes.

Master node can control which tasks will get executed, and how many times. HASingletons also have the ability to share a memory state across clustered partition. Something like caching ...

Solution:
Lets assume that I have a service bean that extends from HASingletonSupport class. HASingletonSupport in its turn extends from HAServiceMBeanSupport
and implements two interfaces: HASingletonMBean and HASingleton. All of them give me those wonderful APIs that can tell me whether the current node is the master or not, what the status of my cluster, how many nodes etc. etc.
  1. public class MyHAService extends HASingletonSupport implements
  2. MyHAServiceMBean {

  3. private static Logger logger =
  4. Logger.getLogger(MyHAService.class);

  5. public void startService() throws Exception {
  6. logger.info(" *** STARTED MY SINGLETON SERVICE *** ");
  7. super.startService();
  8. }

  9. public void stopService() throws Exception {
  10. logger.info(" *** STOPPED MY SINGLETON SERVICE *** ");
  11. super.stopService();
  12. }

  13. public boolean isMasterNode() {
  14. return super.isMasterNode();
  15. }


  16. public void startSingleton() {
  17. logger.info(" *** CURRENT NODE IP:"
  18. + this.getPartition().getClusterNode()
  19. .getIpAddress().getHostAddress() +
  20. " ELECTED AS A MASTER NODE *** ");
  21. }


  22. public void stopSingleton() {
  23. logger.info(" *** CURRENT NODE IP:"
  24. + this.getPartition().getClusterNode()
  25. .getIpAddress().getHostAddress()
  26. + " STOPPED ACTING AS A MASTER NODE *** ");
  27. }


  28. public void partitionTopologyChanged(List newReplicants, int newViewID) {
  29. logger.info(" *** TOPOLOGY CHANGE STARTING *** ");
  30. super.partitionTopologyChanged(newReplicants, newViewID);

  31. }
  32. }
startSingleton() - invoked when the current node elected as a master.
stopSingleton() - invoked when the current node stops acting as a master.
partitionTopologyChanged() - invoked when new node joins or leaves the cluster.

As i mentioned before, I have the ability to know whether the current node is the master node, by calling isMasterNode(). The method will return true if the node is master and false if its not.

In case I already know that the current node is not the master, I can ask the clustered partition (the cluster) which node is the master. For example I can request the current view of my cluster.

The implementation can be similar to the method below which you can have inside your service bean:
  1. private String getMasterSocket() {

  2. HAPartition partition = this.getPartition();

  3. if (partition != null) {

  4. if (partition.getCurrentView() != null) {
  5. return partition.getCurrentView().get(0).toString();

  6. } else {
  7. return null;
  8. }
  9. } else {
  10. return null;
  11. }
  12. }
The method above will return me a string contains port and ip of the master node, for example:
192.168.62.12:1099
The HAPartition service maintains across cluster a registry of nodes in a view order. Now, keep in mind that an order of the nodes in the view, does not necessary reflect the order nodes have joined the cluster.

So the first node in the view as you can see beloew, will be the master node.
Simple as that.
return partition.getCurrentView().get(0).toString();
Please note:
Method getPartition() may return null, if super.startService() hasnt been called. Have a look at implementation of HAServiceMBeanSupport and my other post JBoss Clustering - How many nodes in the cluster?.

Finding the number of cluster nodes in JBoss


Thanks to the Original Author and source

How to find out how many nodes in the cluster

If you want to know how many nodes there are in the current cluster partition, all you have to do is to ask HAPartition for the node list. HAPartition represents your cluster partition, and it contains all the information you need to know about your cluster and the nodes: their host names, IPs, position in the cluster view.

Lets assume you have a service bean that extends from HASingletonSupport. HASingletonSupport in its turn extends from HAServiceMBeanSupport.

HAServiceMBeanSupport is the one who gives you access to HAPartition object.

The code to request for HAPartition object and node list that you see below , you can put somewhere in your service bean:
HAPartition partition = getPartition();
ClusterNode[] nodes = partition.getClusterNodes();
System.out.println(nodes.length);
ClusterNode object represents your node in the cluster. It contains information about node's host name, its internet address and a few more things. getClusterNodes(), returns to you an array contains as many ClusterNode objects as you have currently in your cluster. So by getting the value of array length, you will know how many nodes your cluster has.

Another way, is to do practically the same, but to request from a HAPartition a current view of your cluster:
HAPartition partition = getPartition();
Vector v = partition.getCurrentView();

System.out.println(partition.getCurrentView().size());

for (Object o : v) {
System.out.println(o.toString());
}
The view, which is a Vector contains information about node sockets. When printed, it will return to you a String representation of node ip + port: xxx.xxx.xxx.xxx:port. Also by printing size of the Vector, you will get number of nodes in the cluster.

Important note:
I noticed there is some delay happening from the time when node leaves the cluster to the time when HAPartition returns an updated view. In another words - after node has left the cluster and topology change has occurred, the HAPartition may return to you an old view still containing the dead node. So be careful.

Also, getPartition() may return null, if super.startService() hasnt been called. Have a look at implementation of HAServiceMBeanSupport and my other post JBoss Clustering - HASingleton service.

JBoss Clustering

Thanks to the original author and Source

Singleton Service

A clustered singleton service is deployed on multiple nodes in a cluster but runs on only one of the nodes. The node running the singleton service is typically called the master node. When the master fails, another master is selected from the remaining nodes and the service is restarted on the new master.

clustered singleton diagram
Figure 1. Clustered singleton service

Many times, an application needs to ensure that a certain task is run exactly once. Thus, only one of the nodes in a cluster should execute the task. The other nodes should knowingly remain passive. Examples of singleton tasks include:

  • Sending email to the system administrator when the system is brought up or taken down. This notification does not take into account how many nodes are in the cluster. As long as at least one node is active, the system is up. When all nodes are down, the system is down.
  • Database schema validation upon startup. When a database-driven application is brought up, it is a good practice for the middle tier servers to verify whether the version of the business logic they implement matches the database schema.
  • Sending recurring notifications to system users. For example, a calendar application might send out email prior to each instance of a scheduled recurring meeting.
  • Load balancing of queued tasks. It's popular to use a single coordinator that distributes tasks among nodes in a cluster.
  • Fault tolerance. If an application uses a distributed cache, it is common to designate a single master node responsible for maintaining a current copy of distributed states. The other nodes make requests of the current master node. When the master fails, another node takes over its responsibilities.

While it is fairly easy to implement such singleton tasks in a single VM, the solution will usually not work immediately in a clustered environment. Even in the simple case of a task activated upon startup on one of the nodes in a two-node cluster, several problems must be addressed:

  • When the application is started simultaneously on both nodes, which VM should run the singleton task?
  • When the application is started on one node and then started later on another, how does the second node know not to run the singleton task again?
  • When the node that started the task fails, how does another node know to resume the task?
  • When the node that started the task fails, but later recovers, how do we ensure that the task remains running on only one of the nodes?

The logic to solve these problems is unlikely to be included in the design of a single-VM solution. However, a solution can be found to address the case at hand and it can be patched on the startup task. This is an acceptable approach for a few startup tasks and two-node clusters.

As the application grows and becomes more successful, more startup tasks may be necessary. The application may also need to scale to more than two nodes. The clustered singleton problem can quickly become mind-boggling for larger clusters, where the different node startup scenarios are far more difficult to enumerate than in the two-node case. Another complicating factor is communication efficiency. While two nodes can directly connect to each other and negotiate, 10 nodes will have to establish 45 total connections to use the same technique.

This is where JBoss comes in handy. It eliminates most of the complexity and allows application developers to focus on building singleton services regardless of the cluster topology.

We will illustrate how the JBoss clustered singleton facility works with an example. First, we will need a service archive descriptor. Let's use the one that ships with JBoss under server/all/farm/cluster-examples-service.xml. The following is an excerpt:

<!--    | This MBean is an example of a cluster Singleton    -->
<mbean code="org.jboss.ha.singleton.examples.HASingletonMBeanExample"
name="jboss.examples:service=HASingletonMBeanExample">
</mbean>
<!- - -->
<!-- | This is a singleton controller which works similarly to the
| SchedulerProvider (when a MBean target is used) -->
<mbean code="org.jboss.ha.singleton.HASingletonController"
name="jboss.examples:service=HASingletonMBeanExample-HASingletonController">
<depends>jboss:service=DefaultPartition</depends>
<depends>jboss.examples:service=HASingletonMBeanExample</depends>
<attribute name="TargetName">jboss:service=HASingletonMBeanExample</attribute>
<attribute name="TargetStartMethod">startSingleton</attribute>
<attribute name="TargetStopMethod">stopSingleton</attribute>
</mbean>
<!- - -->

This file declares two MBeans, HASingletonMBeanExample and HASingletonController. The first one is a singleton service that contains the custom code. It is a simple JavaBean with the following source code:

public class HASingletonMBeanExample
implements HASingletonMBeanExampleMBean {

private boolean isMasterNode = false;

public void startSingleton() {
isMasterNode = true;
}

public boolean isMasterNode() {
return isMasterNode;
}

public void stopSingleton() {
isMasterNode = false;
}
}

All of the custom logic for this particular singleton service is contained within this class. Our example is not too useful; it simply indicates, via the isMasterNode member variable, whether the master node is running the singleton. This value will be true only on the one node in the cluster where it is deployed.

HASingletonMBeanExampleMBean exposes this variable as an MBean attribute. It also exposes startSingleton() and stopSingleton() as managed MBean operations. These methods control the lifecycle of the singleton service. JBoss invokes them automatically when a new master node is elected.

How does JBoss control the singleton lifecycle throughout the cluster? The answer to this question is in the MBean declarations. Notice that the HASingletonMBeanExample-HASingletonController MBean also takes the name of the sample singleton MBean and its start and stop methods.

On each node in the cluster where these MBeans are deployed, the controller will work with all of the other controllers with the same MBean name deployed in the same cluster partition to oversee the lifecycle of the singleton. The controllers are responsible for tracking the cluster topology. Their job is to elect the master node of the singleton upon startup, as well as to elect a new master should the current one fail or shut down. In the latter case, when the master node shuts down gracefully, the controllers will wait for the singleton to stop before starting another instance on the new master node.

A singleton service is scoped in a certain cluster partition via its controller. Notice that, in the declaration above, the controller MBean depends on the MBean service DefaultPartition. If the partition where the singleton should run is different than the default, its name can be provided to the controller via the MBean attribute PartitionName.

Clustered singletons are usually deployed via the JBoss farming service. To test this example, just drop the service file above in the server/all/farm directory. You should be able to see the following in the JBoss JMX web console:

JMX Console, HASingletonController
Figure 2. Controller MBean view. The MasterNode attribute will have value True on only one of the nodes.

JMX Console, HASingletonMBeanExample
Figure 3. Sample singleton MBean view. The MasterNode attribute will have the same value as the MasterNode attribute on the controller MBean.

Saturday, October 17, 2009

Brief on JBoss EAR Deployment

EAR Deployment Process:

1) The EAR starts getting deployed and EARDeployer is the main class that does that.

2) All the dependent jars are scanned and deployed if not deployed. MainDeployer is the main class that does this.

3) The Queue Sevice and Topic Service will be started if there are any topics or queues defined in the Application. TopicService and QueueService are the main class that does this.

4) EJB3Deployment begins, which deploys Enterprise beans and Persistence Units in the application or module. EJB3Deployer iterates through the ear to find all the jars which has persistence units and enterprise beans for deployment.

a) If a persistence unit is detected, first an corresponding MDB will be created and registered into JMXServer. Similarly if an EJB is detected, a corresponding MDB is created and registered into JMX. JmxKernelAbstraction is the main class that does this.

b) Once PersistenceUnitMDB is registered, the service is started to create all the relevant tables n EntityManager relationships etc into db and PersistenceUnitDeployment is the class that does this.

c) Similarly once EJBMDB is registered, the service is started using EJBContainer class.

5) Once EJB Deployment is done, TomcatDeployer will deploy the web application if any in the particular module being scanned.

6) Cluster Session Management is started for this particular application, JBossCacheManager is the one responsible for this.

7) Once all the above steps are done, the application can have application specific database initializers, inventory trackers, etc started.


Before the EAR Deployment begins, all the services starting from Transaction Service, Timer Service, UDDI, WebService, etc would have started.
All the JBoss related Webapps like jmx-console, web-console will start. Once all these JBoss goes ahead with the EAR Deployment.

JBoss Lookup

Thanks to the original author.
You can find the original source here


Many a times when you are doing a lookup in the JNDI tree, you see javax.naming.NameNotFoundException. A simple code that does the lookup will look something like:

  1. Context ctx = new InitialContext();
  2. Object obj = ctx.lookup("somepath/somename");


This code just looks up the JNDI tree to get an object bound by the name "somepath/somename". Looks simple. However, chances are that you might even see this exception:

  1. javax.naming.NameNotFoundException: somepath not bound
  2. at org.jnp.server.NamingServer.getBinding(NamingServer.java:529)
  3. at org.jnp.server.NamingServer.getBinding(NamingServer.java:537)
  4. at org.jnp.server.NamingServer.getObject(NamingServer.java:543)
  5. at org.jnp.server.NamingServer.lookup(NamingServer.java:267)
  6. at sun.reflect.NativeMethodAccessorImpl.invoke0(Native Method)
  7. at sun.reflect.NativeMethodAccessorImpl.invoke(NativeMethodAccessorImpl.java:39)
  8. at sun.reflect.DelegatingMethodAccessorImpl.invoke(DelegatingMethodAccessorImpl.java:25)
  9. at java.lang.reflect.Method.invoke(Method.java:585)
  10. at sun.rmi.server.UnicastServerRef.dispatch(UnicastServerRef.java:294)
  11. at sun.rmi.transport.Transport$1.run(Transport.java:153)
  12. at java.security.AccessController.doPrivileged(Native Method)
  13. at sun.rmi.transport.Transport.serviceCall(Transport.java:149)
  14. at sun.rmi.transport.tcp.TCPTransport.handleMessages(TCPTransport.java:460)
  15. at sun.rmi.transport.tcp.TCPTransport$ConnectionHandler.run(TCPTransport.java:701)
  16. at java.lang.Thread.run(Thread.java:595)
  17. at sun.rmi.transport.StreamRemoteCall.exceptionReceivedFromServer(StreamRemoteCall.java:247)
  18. at sun.rmi.transport.StreamRemoteCall.executeCall(StreamRemoteCall.java:223)
  19. at sun.rmi.server.UnicastRef.invoke(UnicastRef.java:126)
  20. at org.jnp.server.NamingServer_Stub.lookup(Unknown Source)
  21. at org.jnp.interfaces.NamingContext.lookup(NamingContext.java:625)
  22. at org.jnp.interfaces.NamingContext.lookup(NamingContext.java:587)
  23. at javax.naming.InitialContext.lookup(InitialContext.java:351)


Look closely at the stacktrace. It shows that while looking up the JNDI tree it could not find the jndi name "somepath" (this name may vary). The reason is simple, the JNDI tree does not have any object bound by this name.

To quote the javadocs of this exception "This exception is thrown when a component of the name cannot be resolved because it is not bound."

So how do i know, what's the name to which my object is bound? Each application server, usually provides a JNDI view which can be used to see the contents of the JNDI tree. If you know what object you are looking for (ex: the name of the bean), then you can traverse this JNDI tree to see what name it is bound to. The JNDI view is specific to every application server.

To give an example, JBoss provides its JDNI tree view, through the JMX console. Here are the steps, one has to follow to check the JNDI tree contents on JBoss:

- Go to http://<>:<>/jmx-console (Ex: http://localhost:8080/jmx-console)
- Search for service=JNDIView on the jmx-console page
- Click on that link
- On the page that comes up click on the Invoke button beside the list() method
- The page that comes up will show the contents of the JNDI tree.

Here's an sample of how the output looks like(just a small part of the entire output):

  1. java: Namespace

  2. +- XAConnectionFactory (class: org.jboss.mq.SpyXAConnectionFactory)
  3. +- DefaultDS (class: org.jboss.resource.adapter.jdbc.WrapperDataSource)
  4. +- SecurityProxyFactory (class: org.jboss.security.SubjectSecurityProxyFactory)
  5. +- DefaultJMSProvider (class: org.jboss.jms.jndi.JNDIProviderAdapter)
  6. +- comp (class: javax.naming.Context)
  7. +- JmsXA (class: org.jboss.resource.adapter.jms.JmsConnectionFactoryImpl)
  8. +- ConnectionFactory (class: org.jboss.mq.SpyConnectionFactory)
  9. +- jaas (class: javax.naming.Context)
  10. | +- dukesbank (class: org.jboss.security.plugins.SecurityDomainContext)
  11. | +- HsqlDbRealm (class: org.jboss.security.plugins.SecurityDomainContext)
  12. | +- jbossmq (class: org.jboss.security.plugins.SecurityDomainContext)
  13. | +- JmsXARealm (class: org.jboss.security.plugins.SecurityDomainContext)


  14. Global JNDI Namespace

  15. +- ebankTxController (proxy: $Proxy79 implements interface com.sun.ebank.ejb.tx.TxControllerHome,interface javax.ejb.Handle)
  16. +- ebankAccountController (proxy: $Proxy75 implements interface com.sun.ebank.ejb.account.AccountControllerHome,interface javax.ejb.Handle)
  17. +- TopicConnectionFactory (class: org.jboss.naming.LinkRefPair)
  18. +- jmx (class: org.jnp.interfaces.NamingContext)
  19. | +- invoker (class: org.jnp.interfaces.NamingContext)
  20. | | +- RMIAdaptor (proxy: $Proxy48 implements interface org.jboss.jmx.adaptor.rmi.RMIAdaptor,interface org.jboss.jmx.adaptor.rmi.RMIAdaptorExt)
  21. | +- rmi (class: org.jnp.interfaces.NamingContext)
  22. | | +- RMIAdaptor[link -> jmx/invoker/RMIAdaptor] (class: javax.naming.LinkRef)
  23. +- HTTPXAConnectionFactory (class: org.jboss.mq.SpyXAConnectionFactory)
  24. +- ConnectionFactory (class: org.jboss.mq.SpyConnectionFactory)
  25. +- ebankCustomer (proxy: $Proxy67 implements interface com.sun.ebank.ejb.customer.LocalCustomerHome)
  26. +- UserTransactionSessionFactory (proxy: $Proxy14 implements interface org.jboss.tm.usertx.interfaces.UserTransactionSessionFactory)
  27. +- ebankCustomerController (proxy: $Proxy77 implements interface com.sun.ebank.ejb.customer.CustomerControllerHome,interface javax.ejb.Handle)
  28. +- HTTPConnectionFactory (class: org.jboss.mq.SpyConnectionFactory)
  29. +- XAConnectionFactory (class: org.jboss.mq.SpyXAConnectionFactory)
  30. +- TransactionSynchronizationRegistry (class: com.arjuna.ats.internal.jta.transaction.arjunacore.TransactionSynchronizationRegistryImple)
  31. +- ebankAccount (proxy: $Proxy68 implements interface com.sun.ebank.ejb.account.LocalAccountHome)
  32. +- UserTransaction (class: org.jboss.tm.usertx.client.ClientUserTransaction)
  33. +- UILXAConnectionFactory[link -> XAConnectionFactory] (class: javax.naming.LinkRef)
  34. +- UIL2XAConnectionFactory[link -> XAConnectionFactory] (class: javax.naming.LinkRef)
  35. +- queue (class: org.jnp.interfaces.NamingContext)
  36. | +- A (class: org.jboss.mq.SpyQueue)
  37. | +- testQueue (class: org.jboss.mq.SpyQueue)
  38. | +- ex (class: org.jboss.mq.SpyQueue)
  39. | +- DLQ (class: org.jboss.mq.SpyQueue)
  40. | +- D (class: org.jboss.mq.SpyQueue)
  41. | +- C (class: org.jboss.mq.SpyQueue)
  42. | +- B (class: org.jboss.mq.SpyQueue)


Let's see what this tells us. Let's consider the Global JNDI Namespace first. It contains (among other things) the following:
  1. +- ebankTxController (proxy: $Proxy79 implements interface com.sun.ebank.ejb.tx.TxControllerHome,interface javax.ejb.Handle)


This tells me that an object which implements com.sun.ebank.ejb.tx.TxControllerHome and javax.ejb.Handle interfaces is bound to the JNDI tree by the jndi-name "ebankTxController". So if at all i have to lookup this object, my lookup code would be something like:

  1. Context ctx = new InitialContext();
  2. ctx.lookup("ebankTxController");


Similarly in the same Global JDNI Namespace, we see :

  1. +- queue (class: org.jnp.interfaces.NamingContext)
  2. | +- A (class: org.jboss.mq.SpyQueue)


Make note of the nesting of the names here. This tells me that an object of type org.jboss.mq.SpyQueue is bound by the name "A under the path queue". So your lookup for this object should look like:

  1. Context ctx = new InitialContext();
  2. ctx.lookup("queue/A");


Now let's move on to the java: namespace in the JNDI tree view above. The difference between a Global JNDI namespace and the java: namespace is that, the object bound in the java: namespace can be looked-up ONLY by clients within the SAME JVM. Whereas, in case of Global JNDI namespace, the objects bound in this namespace can be looked-up by clients, even if they are not in the same JVM as the server. One would ask, how does this matter? Consider a standalone java program(client) which tries to lookup some object on the server (running in its own JVM). Whenever a standalone client is started (using the java command), a new JVM is instantiated. As a result, the server (which is started in its own JVM) and the client are running on different JVMs. Effectively, the client will NOT be able to lookup objects bound in the java: namespace of the server. However, the client can lookup the objects present in the Global JNDI namespace of the server.

So, why are we discussing these details, in a topic which was meant to explain the NameNotFoundException? Let's consider the java: namespace output above. There's a

  1. +- DefaultDS (class: org.jboss.resource.adapter.jdbc.WrapperDataSource)


This tells me that there's an object bound to the name DefaultDS in the java: namespace. So my lookup code would be:

  1. Context ctx = new InitialContext();
  2. ctx.lookup("java:/DefaultDS");


As explained above, this code is going to return you the object, if this piece of code runs in the same JVM as the server. However, if this piece of code is run from a client in different JVM (maybe a standalone client), then it's going to run into NameNotFoundException. The reason i explained the java: and the Global JNDI namespace is that, sometimes people are surprised that even though the JNDI view shows that the object is bound in the java: namespace(with the same name as the one they pass to the lookup method), they still run into NameNotFoundException. The probable reason might be, the client is in a different JVM.

Thursday, October 1, 2009

All you need to know about Javascript Inheritance

Classical Inheritance

<html>
<script>
function Person(name)
{
this.name = name;
}

Person.prototype.getName = function() {
return this.name;
}


function Author(name, book)
{
Person.call(this, name);
this.book = book;
}


Author.prototype = new Person();

Author.prototype.getBook = function() {
return this.book;
}


var simpson = new Author("Simpson", "The Big Fat Book");
alert(simpson.getName());
alert(simpson.getBook());

function Me()
{
Author.call(this, "Vinuth", "GentleMenz Arena");
}

Me.prototype = new Author();

Me.prototype.getBook = function() {
return "MyBreadBasket";
}

var me = new Me();
alert(me.getName() + " - " + me.getBook());
</script>
</html>

How of Classical Inheritance

1) Define a function as a constructor,
for e.g., Person, Author and Me shown above.

2) Constructors initializes the member variables and methods using the "this" keyword as shown in Person and Author constructors.

3) Define the complete structure by adding methods.
In the above example Person is defined as having a method called getName.
In javascript prototype keyword is used extensively for this as shown below.

Person.prototype.getName = function() {
return this.name;
}


4) Extend Author from Person and this is done using two steps.
a) In the constructor of Author call the Person's constructor like Person.call(this,...);
"this" as the parameter to the call method says that you are invoking Person in the Author's context,
i.e., "this" here refers to Author's Object.
b) Prototype chaining:
It is a way to define the hierarchy of objects.
Here Author's prototype is linked to Person meaning Author is an extension of Person or Author is of type Person.
This is done using Author.prototype = new Person();

5) Creating the objects is as simple as "var author = new Author();" and calling a method of its super class will be like "author.getName();"


Prototypal Inheritance

<html>
<script>

var Person = {
name: "Vinuth",
getName: function() {
return this.name;
}
};


alert(Person.getName());

function clone(obj)
{
function F(){}
F.prototype = obj;
return new F();
}

var Author = clone(Person);

Author.setName = function(name) {
this.name = name;
}

alert(Author.getName());
Author.setName("Chet");
alert(Author.getName());


</script>
</html>


All about Prototypal Inheritance

1) Most importantly there is no use of keyword "function" for defining the classes.
There is no concept of classes.
The beauty of Prototypal language is that everything is an object and there is no class concept at all.
As you can see in the above example Person is not a class but its an object and it is defined using the configuration object.
Configuration objects are defined as {...} within the flower brackets "{}".

2) Since there is no concept of classes and everything in Prototypal language is object, we do not use the keyword "new" at all.

3) extends is achieved by using prototype keyword as shown in the clone() method above.

4) Any objects can be extended as easily as just defining a method or property on the object directly as follows

Author.setName = function(name) {
this.name = name;
}